
Fuel Tanks and Drinking Water
All our drinking water comes from the high quality aquifer below the Riverdale neighbourhood. Being underground, it’s less likely to be contaminated than surface water sources. However, surface activities from households can harm our drinking water, as well as enter the Yukon River through the storm sewer system.
Here’s how you can help protect our drinking water and our environment.
Fertilizers on lawns often run off into storm drains on the street and drain into the Yukon River. The chemicals in fertilizer can increase nutrient growth in the river and affect fish.Chemicals can also leach directly into the aquifer.
Consider using natural soil amendments like compost. If you decide to fertilize, use slow-releasing methods. Apply fertilizer into 4-6 inches of soil, and not on the surface of lawns.
As with fertilizers, pesticides can run off into the storm sewer and leach into the groundwater.
Hazardous waste should be properly stored and disposed of at HHW days. If not, waste oil, fuel and other harmful products can spill and leach into the groundwater. Make sure you store these materials in their original containers if possible; or in strong, undamaged containers with secure lids. Clearly mark the contents on the container as you will be asked about them at HHW days. Keep them safe from vandalism, floods, and risk of damage.
Buy only as much of a hazardous product as you need, or the rest will be wasted. Twice a year, the City of Whitehorse and the Yukon government will receive your household hazardous waste free of charge.
Underground storage tanks pose a high risk to groundwater. They are closer to the aquifer and leaks can develop without being noticed. Residents of Riverdale should be aware that a spill their yard could contaminate the entire drinking water aquifer. This would be a long-term, costly problem.
Above ground storage tanks also pose a risk to our drinking water. If a tank is not well-maintained, leaks and spills can occur. Not only does this threaten the aquifer and the environment, clean-up can be costly and might not be covered under your insurance policy. See below for more information about fuel tank maintenance.
Fuel Storage
Fuel leaks from home heating tanks have the potential to contaminate our water supply and environment, particularly if they are close to drinking water wells.
Leaks typically result from corrosion inside a steel tank. The corrosion is often not noticed because it occurs on the inside of the tank and creates pinhole leaks. Leaks and spills also result from unprotected tanks and fuels lines, insufficient supports, and spills during filling.
Underground tanks are a high contamination risk to our aquifer because leaks are especially difficult to detect. While most insurance companies no longer provide coverage to homes with underground tanks, some remain in use. Others are no longer used, but remain in the ground and might not have been properly abandoned.
If the tank is still in use, it is recommended that you remove or properly decommission or abandon the tank. Contact an environmental services company for assessment and removal.
You might find a tank while doing other work in your yard. Before disturbing it, check with the Fire Marshal’s office to see if a permit has been issued for it to be abandoned. If you want to remove it, contact an environmental services company.
Yukon Housing Corporation can provide loans under its Home Repair Program for the approved removal or abandonment of a buried fuel tank and its replacement.
Proper storage of heating fuel will help protect our drinking water from contamination, and save you from a big headache if a spill occurs. Check that your tank meets these specifications:
Your tank should:
- Be in a safe location and protected from physical damage
- Have protection for all fuel lines and fittings
- Have proper support and restraints
- Be sloped towards the outlet
Help prevent leaks by:
- Keeping your tank full to reduce condensation
- Adding a fuel additive before fill up
- Checking the physical condition of the tanks, fittings, valves and fuel lines regularly
- Looking for drips and ground staining
- Booking an annual inspection by a certified Oil Burner Mechanic
Click here for Yukon Housing’s oil tank checklist. See our section on oil tank maintenance below.
For a more thorough guide to fuel storage and tank maintenance, see “A Guide to Home-heating Oil Tanks” by Yukon Housing.
Oil Tank Maintenance
Oil spills can migrate very quickly into the groundwater. If you live in Riverdale, a spill in your yard could contaminate the drinking water aquifer very quickly.
The best way to prevent a leak or spill is to inspect and maintain your fuel tank. Read on for more information, or download a checklist here.
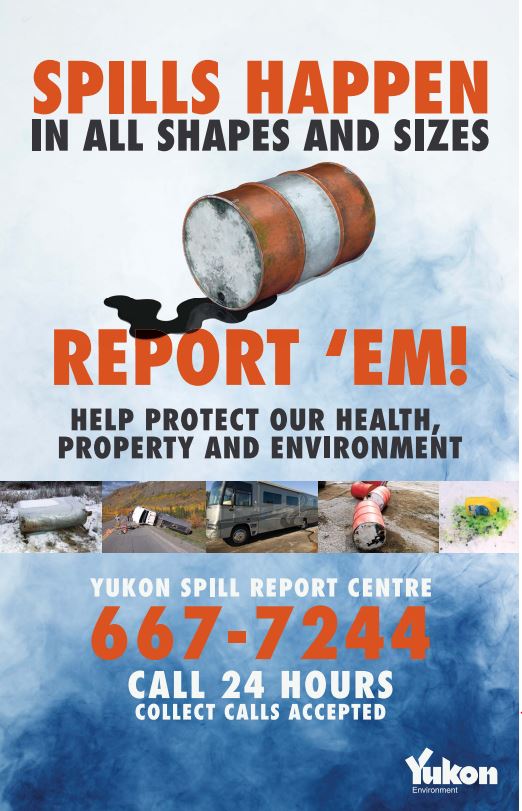
If you see or smell fuel around your tank, you might have a leak or spill. Act quickly to prevent further spillage and groundwater contamination.
- Stop the flow of oil at the source. If it’s a leak in the line, turn off the shut off valve at the tank. Plug the hole if it’s safe to do so, and place a container under the leak. Monitor how much is leaking.
- Absorb fuel using something absorbent (cat litter, absorbent pads, peat moss, rags, etc). Never flush any oil-soaked materials. Store them safely in a non-flammable container, outdoors, out of heat and dispose at Household Hazardous Waste Day.
- Prevent the fuel from entering floor drains or spreading to areas that are difficult to clean (such as under equipment, in corners, etc).
- Turn off the furnace.
- Call the 24-hour Yukon Spill Report Line at 867-667-7244. Visit Environment Yukon for more information about spill reporting.
- Call your oil supplier or an environmental service to arrange to pump out the remaining oil.
- Call your insurer as soon as possible.
- Document the spill–take photos and write down details.
- Indoor tanks–if the leak or spill is indoors, also:
- Turn off the power to the furnace
- Prevent fuel from entering floor drains
- Eliminate anything that might ignite the fuel, like smoking or flames, and appliances (don’t use a shop vac to clean up the fuel!).
- Be aware of the build-up of fumes indoors.
- If the spill or leak cannot be stopped, catch the flowing liquid using a pan, pail, hubcap, shovel or whatever is available. Spreading absorbent material, such as kitty litter, sand, ground corncobs, straw, sawdust, wood chips, peat, synthetic absorbent pads, or dirt. An absorbent may stop the flow and soak up the petroleum on pavement. (Note that this will not make the petroleum nonflammable.)
A proper tank is the first precaution against spills and leaks. The standard for oil tanks has increased over the past few years. Many existing tanks do not meet these standards.
Some insurers will not insure homes with outdated tanks. If you have owned your home for a long time, your insurer might not have asked you about your tank for several years.
- Double-walled tanks are best. Single wall tanks are at a high risk to fail. Consider replacing it with a double-walled tank, which has an extra wall at the bottom. They can contain a leak for longer, although a metal inner wall will still corrode without proper maintenance.
- Plastic or fibreglass tanks are preferable to steel, though more expensive. If you are replacing your tank in order to sell the house, a more expensive tank will be a selling feature to a new owner, who would likely have to replace a steel tank within a few years.
- Secondary containment units are also available and should be able to hold 110% of the contents of the tank.

Fuel tanks should be inspected annually, along with your entire heating system. Follow the list below, or print off this checklist. If you observe any of the following, contact a certified oil burner mechanic for further advice.
- Look for signs of oil–drips or ground staining. This might be a leak. Contact a certified oil burner mechanic or environmental company immediately and refer to the section above “What to do if you have a spill or leak.”
- Is there the smell of fuel? Try to check after each fill, which is when spills often happen.
- Check for bent or pinched fuel lines
- Check fittings for cross-threading
- Is the fuel gauge cracked?
- Keep your tank full (~80%), even in summer, to minimize condensation inside the tank, which can lead to corrosion.
- But don’t overfill. The fuel needs a head-space for expansion. With temperature increase, the fuel might back up through the fill pipe and cause a spill.
- A vent whistle installed on the vent pipe should prevent the fuel delivery person from overfilling. Check to make sure your tank has one.
- Add a fuel treatment periodically to disperse any moisture that can build up in the bottom of the tank.
- Check for corrosion at the bottom of the tank. Corrosion happens from the inside out, so you might not see anything. If there is a dark line, there is likely corrosion. Don’t touch corrosion: you might make a hole.
- Check for water in your tank. You can check this by putting line of water detecting paste on a long stick, then dipping the stick into your fill spout. The paste will change colour where there is water.
- Ensure there’s a rain cap on the tank’s filler pipe and vent pipe to keep water out.
- Look for nearby hazards: can the tank be affected by moving cars, equipment, falling trees, children playing, passersby?
- Keep fuel lines clear of snow and falling branches.
If you have water in your tank, you can use a home heating fuel additive to displace water and eliminate sludge. Some companies add this routinely, while others do it on request.
For small amounts of water, you can also it using a number of water absorber products. They are typically a pouch of absorbant that is lowered into the tank and removed after about a day. Brands include H2O Water Worm, Water Snake, and Water Magnet.
It’s likely that at some point your tank will need to be replaced. If you make the decision to replace your tank,there are a few things to keep in mind.
- You cannot install a second-hand tank.
- Oil should not be transferred to a new tank unless it is filtered. Sludge, acid , water and microorganisms will contaminate the new tank.
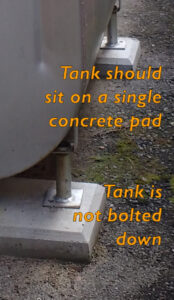
- A tank must be placed on a single solid pad, on undisturbed, or compacted soil, and the tank needs to be bolted to the slab to prevent toppling, lifting, settling, due to earthquakes, floods, are ground settlement.
- Only a certified oil burner mechanic can install an oil tank.
- Your insurance company might have a different standard, so contact them beforehand.
When installing a new oil tank, a certified oil burner mechanic must meet certain requirements, which are outlined in this checklist.
Your oil tank might not meet the current standards. Look at your outdoor tank and see whether it is located correctly.
- Tanks should have space around to allow air movement and inspection. They shouldn’t be under decks or stairs.
- Tanks should not block doorways or windows.
- Tank’s vent pipe must be at least two feet from opening windows, and away from ventilation air intakes.
- Tanks should be in a safe, out-of-way location and protected from vehicles, wind, falling branches, ice or snow. Children should not play on or near fuel tanks or lines.
- Avoid south-facing installations. Tanks that get a lot of sunlight will degrade more quickly.
If your tank is not well located, consider having it moved by a professional. It must be empty first. Contact your fuel company or an environmental service to pump it out.
If moving your tank is not practical, consider installing a solid barrier to protect it from vehicles, and make sure fuel lines are protected.
For indoor tanks, you can read more about proper location in “A Guide to Home Heating Oil Tanks”.
New tanks are installed to minimize fuel lines and keep them protected. Your tank might not have been properly installed, or lines might have shifted. Consider the following when inspecting your tank.
- There should be easy access to the line for inspection.
- All line connections must be tight. If a connection is dirty or dark, it could be leaky.
- Oil filters should be located indoors near your furnace, not outside. They should be changed every year by a certified burner mechanic.
- Buried single-wall fuel lines are no longer allowed because they can rupture and leak undetected.
- Fuel lines must have a water proof jacket where they pass through walls and have secondary containment (double walled) if they go underground.
- Fuel lines should be protected from falling ice, especially near roofs. Shield the lines, or have them moved
- Keep lines clear of drifting snow.
- Do not let children or animals play on or near fuel lines
 There are standards for how a tank is secured. Your tank might not meet these standards. Verify that your tank is stable and resistant to shifting or earthquakes.
- The ideal foundation for a tank is a large reinforced concrete pad with the metal tank or tank stand is bolted down. Patio stones or sidewalk blocks are not stable enough.
- The ground underneath the concrete pad must be non-organic, undisturbed, and well compacted, to prevent shifting over time. Water should be able to drain through, to prevent shifting from the ground freezing and thawing.
- Wooden tank stands are prohibited and must be replaced.
- Tanks should never be fastened to the wall of a building.
- Tanks must have adequate seismic restraints.
If your tank is not stable, consider hiring a certified burner mechanic or environmental company to add stability. Your tank might be deficient in several aspects, which would warrant replacement rather than relocation.